Friday, August 28, 2009
Fabric Giveaway!!
Check out this blog for a free scrap fabric giveaway. I love giveaways and I LOVE fabric. Good Luck to you all.
(photo from the giveaway blog )
Tuesday, August 25, 2009
Taking in a Dress - How to Alter a Dress
I purchased this dress shortly after having a baby. I love simple black dresses! However, this dress is a bit larger around middle than I would like it to be. It's not very flattering. It hangs like a large t-shirt. I found this dress sitting in the back of my closet recently, not getting any use. I figured it would be pretty simple to take the two side seams in a bit and give the dress a new look.
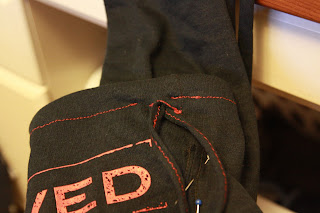
I pinned the dress starting in the sleeve - right under the armpit. From there, I gradually took the pins out to an inch away from the original seam. I continued this inch pin line all the way to the bottom of the dress.
Because the dress was very simple to start with, taking the dress in was possible. The original serge/seam line was straight from the hem of the sleeve, all the way down to the hem of the dress.
Now. . . if I can just figure out a simple way to take the collar in just a bit. The boat neck is probably an inch wider than I would want it! Oh well, it will have to do.
I pinned the dress starting in the sleeve - right under the armpit. From there, I gradually took the pins out to an inch away from the original seam. I continued this inch pin line all the way to the bottom of the dress.
Because the dress was very simple to start with, taking the dress in was possible. The original serge/seam line was straight from the hem of the sleeve, all the way down to the hem of the dress.
Before and after. Pinned from the inside and finished from the outside.
I wore the dress the next day and felt like I had on a new dress! It's not incredible fitted, but it doesn't hang so loose :) anymore.
Now. . . if I can just figure out a simple way to take the collar in just a bit. The boat neck is probably an inch wider than I would want it! Oh well, it will have to do.
Monday, August 24, 2009
Quilted Kitchen Rug
A matching kitchen rug is what I made to match my hot pads! I'm slowly trying to get my small apartment kitchen to coordinate.
Step #1 -
Cut out top and bottom. I made the bottom 16 x 25 (the picture shows different, I cut a bit of later - still not sure how I was going to finish the edges). On the top I cut out 4, 5 x 25 pieces.
Step #2 -
Sew the pieces together 1/2 inch seam allowance. Press seams open.
Step #3 -
I used an old blanket for the batting. I took a small - used - baby quilt and folded it in half. I put the bottom piece of the rug (right side facing down) on the ground and then put the baby blanket on top of it - matching up the right angle corners. Then I put the top piece, facing out, on top - matching the corners as well.
I didn't want to cut the blanket until it was sewn in my rug (you could cut it now if you wanted). I pinned the blanket to the rug pieces and quilted the straight seam stitches. This now held all my pieces together.
Step #4 -
Notice how the blanket is hanging out on both sides. Pin around the 4 edges and baste together. After you baste, trim off the extra blanket.
Step #5 -
Get your bias tape ready. My bias tape (again in this case it wasn't "bias" tape, it was cut on the grain). was cut from the same fabric as the bottom of the rug.
Tape = Fold fabric in half, press. Then fold each side into the center fold. Press.
Step #6 -
Pin tape to rug. Stitch first seam all the way around. Stitching will be on the outside fold line.
Step #7 -
Turn the tape around and pin so the tape closes off the raw edge. Stitch around rug.
Finished Rug. Front and Back.
(notice the baby proof tie on my kitchen cabinets)
Friday, August 21, 2009
Matching Kitchen Decor
Hopefully in the next day or two I will post some matching kitchen decor I've been working on. They match the hot pads posted yesterday. Stay posted! I'm pretty excited.
Thursday, August 20, 2009
Quilted Hot Pads
I have been in need of some hot pads since I got married. I only own one oven mitt, and that is from an estate sale after someones mother passed away. It was $.25!! Can't beat that. But I sure can beat the look of the old mitt.
After using rag after rag, towel after towel to put hot pans on, I decided it was time to break down and make some decent hot pads. I knew my kitchen would look better and I would smile each time I used them.
I found a great tutorial here for super cute quilted hot pads. With this as a guideline, I pulled out my fabric and went to work. Here are the steps I took:
Step #1 -
Choose your fabric. I chose two different patterns to keep it simple. I decided I would make two hot pads and alternate the colors of the two - making them slightly different but still a set.
Step #2 -
Measure and cut out each square - 9 inches by 9 inches (finished hot pad = 8x8). This is the back of the hot pad. Cut out as many hot pads as you are making.
Step #3 -
Cut 4 stripes of fabric for each hot pad front. I cut them 9 X 3 (this leaves a small 1/4" seam allowance between stripes and a bit more on the outside edge). Cut your batting 8X8".
Step #4 -
Sew the stripes together with 1/4" seam allowance. Press seams open when done.
Step #5 -
Layer your front, batting, and back together and sew around edge. 1/4-1/2" seam allowance.
*note - you should probably do step #10 next, I forgot and did it after the bias tape was already sewn on. Doing it now will make the finished product look nicer!
Step #6 -
Make your bias seam tape. I did not make my tape on the bias. I cut stripes of 40"X 2.5". Press in half and then bring both sides into that center fold. Press.
Step #7 -
Pin tape to edge of hot pad. Leave a tail for a hanging hook (bottom photo).
*As you pin, you should see how the tape folds around the raw edge - this can be a check to make sure you're pinning it the right way.
Step #8 -
Sew the first seam of tape to hot pad. This will attach only the first side of the tape. Leave the tail un-sewn for now.
Step #9 -
Decide how long you want your hanging hook to be (top right). Cut off the rest of tail and top stitch tail from the end going towards the hot pad (top left). Stop before you get the the hot pad and tuck tail into the tape hiding the end. You will also tuck the ending side of the tape in this opening (bottom pictures). Continue top stitching around the hot pad, finishing the seam and closing off the tape.
Step #10 -
Stitch along your stripes seams. This will quilt the hot pad and keep all layers together.
*note - this step would be better off if done after Step #5. Doing it earlier will hide you back stitching on each end, under your bias tape.
Step #11 -
Hot pad should be done and ready to use. I made two hot pads with the back and bias tape colors swapped. You can see my alternating fabric better on step #8.
After using rag after rag, towel after towel to put hot pans on, I decided it was time to break down and make some decent hot pads. I knew my kitchen would look better and I would smile each time I used them.
I found a great tutorial here for super cute quilted hot pads. With this as a guideline, I pulled out my fabric and went to work. Here are the steps I took:
Step #1 -
Choose your fabric. I chose two different patterns to keep it simple. I decided I would make two hot pads and alternate the colors of the two - making them slightly different but still a set.
Step #2 -
Measure and cut out each square - 9 inches by 9 inches (finished hot pad = 8x8). This is the back of the hot pad. Cut out as many hot pads as you are making.
Step #3 -
Cut 4 stripes of fabric for each hot pad front. I cut them 9 X 3 (this leaves a small 1/4" seam allowance between stripes and a bit more on the outside edge). Cut your batting 8X8".
Step #4 -
Sew the stripes together with 1/4" seam allowance. Press seams open when done.
Step #5 -
Layer your front, batting, and back together and sew around edge. 1/4-1/2" seam allowance.
*note - you should probably do step #10 next, I forgot and did it after the bias tape was already sewn on. Doing it now will make the finished product look nicer!
Step #6 -
Make your bias seam tape. I did not make my tape on the bias. I cut stripes of 40"X 2.5". Press in half and then bring both sides into that center fold. Press.
Step #7 -
Pin tape to edge of hot pad. Leave a tail for a hanging hook (bottom photo).
*As you pin, you should see how the tape folds around the raw edge - this can be a check to make sure you're pinning it the right way.
Step #8 -
Sew the first seam of tape to hot pad. This will attach only the first side of the tape. Leave the tail un-sewn for now.
Step #9 -
Decide how long you want your hanging hook to be (top right). Cut off the rest of tail and top stitch tail from the end going towards the hot pad (top left). Stop before you get the the hot pad and tuck tail into the tape hiding the end. You will also tuck the ending side of the tape in this opening (bottom pictures). Continue top stitching around the hot pad, finishing the seam and closing off the tape.
Step #10 -
Stitch along your stripes seams. This will quilt the hot pad and keep all layers together.
*note - this step would be better off if done after Step #5. Doing it earlier will hide you back stitching on each end, under your bias tape.
Step #11 -
Hot pad should be done and ready to use. I made two hot pads with the back and bias tape colors swapped. You can see my alternating fabric better on step #8.
Please let me know if you have any questions! Comments are always welcome!
Wednesday, August 19, 2009
Free Give Away - Don't forget to enter!
Don't forget to enter the flannel board giveaway by tonight!
Winner will be announced tomorrow!
Good Luck!
Winner will be announced tomorrow!
Good Luck!
New Fabric
I made a quick run to Jo-Ann fabric last night. I love that store and could spend so much money if I were allowed to. (In college I worked at Jo-Ann's and took advantage of the employee discount - yet my pay checks weren't always what they could be after spending $$ on fabric)
Here's one of the remnant finds I purchased. Almost a yard each at half the cost!! What a deal! It is heavy weight Home Decoration fabric. I think I'll be make a cute bag or something fun with them. Stay tuned . . .
Laundry Sock Bag
With little tiny socks around my house, I want to try and keep them all matched. One way socks can get lost is in the laundry. I know you can buy little draw string bags to put bras, socks, and small things in for washing. I decided to make my own.
Supplies needed: tulle (softer kind), ribbon
Step 1 -
Cut the size you would like out of the fabric. Mine is about 12 inches wide by 18-20 inches finished. Fold in half and sew up the sides. I cut mine in such a way I only need to sew up the two sides. If you don't have a surger, I recommend zig-zag stitching and using a straight stitch to ensure the fabric will stay sewn together. Sometimes it's tricky with the holes in the fabric.
**Read step #2 before finishing the second side!
Step 2 -
Find a ribbon you like and sew it in a few inches from the top. Make sure the ribbon sticks out on the finished side.
Step 3 - Gather socks and use!
I leave my sock bag draped over the edge of my sons laundry basket, that way I can toss the socks in when they're dirty, rather than sorting them out when I actually do the laundry.
I hope this helps keep your socks and other small things together in the laundry.
Tuesday, August 18, 2009
Fleece Scarf
I know it's only August, but I'm starting to think about the fall and winter already. I LOVE the cold! I love wearing warm clothes and bundling up - call me crazy. This is a quick easy fleece scarf I made.
Fleece fabric - width of your choosing. I made mine about 8-9 inches. The length was the whole 60" of the bolt of fabric.
Sewing the edges - I used a surger to go around the border of the scarf. If you don't have a surger, you could do a decorative stitch or zig-zag with your sewing machine. I suppose you could even blanket stitch the ends with embroidery thread if you don't have a machine.
Monday, August 17, 2009
Pesto recipe - revisted
My morning has been consumed with PESTO! I know I made a post a little while ago about dried basil and pesto, but I wanted to revisit it again today.
I went out early to pick some basil from my garden. I washed each leaf and took the stems off. I made a quick trip to the grocery store to buy the pine nuts and Parmesan. When back home, pulled out all the necessary dishes/tools I would need and began!
I made 3 batches this morning and put 1/2 cup in each zip-lock bag. I freeze the bags and use them all year!
Again, here's the recipe:
Pesto Recipe:
3 cups of fresh basil leaves
1/2 cup olive oil
3-4 cloves of garlic
1/2-3/4 cup fresh grated parmesan cheese (we did half mozzarella to cut the cost)
1/4 cup pine nuts (we also did some with almonds)
optional: 1/2 cup fresh parsley - we didn't add this
Mix in food processor or blender until pureed.
Unless you have an endless supply of basil, pesto can be a bit expensive. Paying lots of money at the store for a small portion of basil is out of the question. Pine nuts were $16 a pound!! and the parmesan was $5 for 8 oz. Olive oil is also not as cheap as canola oil. I am grateful for my garden and the mounds of basil it produces :) My husband and I love pesto so much, it's worth the cost and trouble of making big batches to enjoy the hole year - conveniently by reaching into the freezer!
Sunday, August 16, 2009
Give Away!
I just saw this giveaway and entered. I want to inform everyone out there!
I grew up with flannel board stories and would like to give my children a chance to have similar memories. What a great time to get started!!!
It's for a Flannel Board Cover!
I grew up with flannel board stories and would like to give my children a chance to have similar memories. What a great time to get started!!!
Friday, August 14, 2009
Quick, Easy Headband
I've mentioned in a previous post that I LOVE headbands! In the hot humid weather my hair has to be off my neck. A headband helps add to the ugly bun :)
I found a cute headband tutorial while looking at a friends blog. I will let you look up the instructions on her site - she did an excellent job!
Close up view of the elastic. These were the only ones I had on hand. They are a bit shorter than the ones on the tutorial blog. I lengthened the fabric to compensate.
I found a cute headband tutorial while looking at a friends blog. I will let you look up the instructions on her site - she did an excellent job!
Choosing the fabric I wanted to use from some scraps. I only really had enough of the bigger piece. The other pieces weren't long enough.
I decided to make 2! I'll send one to my sister, who also loves headbands.
Close up view of the elastic. These were the only ones I had on hand. They are a bit shorter than the ones on the tutorial blog. I lengthened the fabric to compensate.
Wednesday, August 12, 2009
Yoga Mat Bag - Using Old T-shirts
I came across this site the other day and figured it was something I wanted to make for my yoga mat. I have a strap that goes around my mat but it doesn't protect the mat from the elements. I just cleaned out my t-shirt drawer and have a pile of t-shirts! I've been looking for a good project to recycles the fabric for. This is project #1 with t-shirt fabric - more to come I'm sure :)
Step #1 - Cut open your t-shirt and get ready to cut out your fabric.
Step #2 - Roll your yoga mat up and measure. Length and width.
Step#3 - Cut out the rectangle for the body of the mat. Make sure to leave enough space for seam allowance and a drawstring at the top.
Step #4 - Make sure the circle circumference is the same as the length bottom of the rectangle (shorter side). Double check the size with the rolled up yoga mat.
You will also want to cut a thin piece of fabric for the draw string and either one or two strippes of fabric for the handles. Length and thickness depends on you. I used the shirt fabric for this as well and cute the handles about 3-4 inches wide, the length of the bag. The tie I cut 1-2 inches wide about 20-24 inches.
Step #5 - With right sides together, stitch up the long side of the rectangle - body of bag. I did two rows of stitching for durability.
Step #6 - Pin and sew the circle to the bottom of the bag.
Step #7 - On the top of the bag fold over 1/4 -1/2 inch for the drawstring. Once the edge is finished fold over again and stitch casing. Make sure to leave an opening for the tie to be inserted.
Step #8 - I zig-zaged the tied closed - nothing fancy.
Step #9 - Attach a safety pin and thread tie through casing.
Step #10 - Make sure to make some sort of opening for the ties to come through to the front. I made a make-shift button hole, and closed the seams up (not pictured).
Step #11- For the bag handles I used strippes of shirt fabric. To finish the edges, I zig-zaged the edges again (do you notice a trend?). By zig-zagging the edges, it helps prevent the fabric from ripping or fraying, but it also allows the fabric to roll - which is what I wanted the handles to be able to do.
Step #12 - Attach the handles to the bag. I sewed them on he outside of the bag rather than inside the bag seam. Potentially you could sew the handles inside the seam for a nicer look. I wanted this bag to be a little more frayed and rough around the edges.
Step #13 - Admire your work! I made 2 straps. If you prefer, you can make just one. I wanted the option to wear the bag like a backpack (easier for riding a bike).
Step #1 - Cut open your t-shirt and get ready to cut out your fabric.
Step #2 - Roll your yoga mat up and measure. Length and width.
Step#3 - Cut out the rectangle for the body of the mat. Make sure to leave enough space for seam allowance and a drawstring at the top.
Step #4 - Make sure the circle circumference is the same as the length bottom of the rectangle (shorter side). Double check the size with the rolled up yoga mat.
You will also want to cut a thin piece of fabric for the draw string and either one or two strippes of fabric for the handles. Length and thickness depends on you. I used the shirt fabric for this as well and cute the handles about 3-4 inches wide, the length of the bag. The tie I cut 1-2 inches wide about 20-24 inches.
Step #5 - With right sides together, stitch up the long side of the rectangle - body of bag. I did two rows of stitching for durability.
Step #6 - Pin and sew the circle to the bottom of the bag.
Helpful Hint: I changed the stitch size to a slight zig-zag. This allows the stitch to stretch with the fabric, a bit.
Step #7 - On the top of the bag fold over 1/4 -1/2 inch for the drawstring. Once the edge is finished fold over again and stitch casing. Make sure to leave an opening for the tie to be inserted.
Step #8 - I zig-zaged the tied closed - nothing fancy.
Step #9 - Attach a safety pin and thread tie through casing.
Step #10 - Make sure to make some sort of opening for the ties to come through to the front. I made a make-shift button hole, and closed the seams up (not pictured).
Step #11- For the bag handles I used strippes of shirt fabric. To finish the edges, I zig-zaged the edges again (do you notice a trend?). By zig-zagging the edges, it helps prevent the fabric from ripping or fraying, but it also allows the fabric to roll - which is what I wanted the handles to be able to do.
Step #12 - Attach the handles to the bag. I sewed them on he outside of the bag rather than inside the bag seam. Potentially you could sew the handles inside the seam for a nicer look. I wanted this bag to be a little more frayed and rough around the edges.
Step #13 - Admire your work! I made 2 straps. If you prefer, you can make just one. I wanted the option to wear the bag like a backpack (easier for riding a bike).
Subscribe to:
Posts (Atom)