Once again, I love notebooks! THIS one caught my eye.
What a fun idea for scrap fabric. I like the patchwork one of the left. I save scraps of fabric for projects like this.

Monday, March 29, 2010
Friday, March 26, 2010
Serger Basic Tips - Starting and Ending a seam
Starting a seam hiding the loose serger thread:
 Start your seam holding the loose thread out to the side.
 Take the thread and bring it forward.
 Cross it over the new seam and serge over it.
 Your finished seam should look something like the above picture. A nice finished edge.
Ending a seam and the loose serger thread:
 Serge to the end of your stitching line.
 Give your thread a little slack by pushing your finger against the two needle threads. You will need this slack for flipping your fabric over. Turn your fabric over (keeping the end as close to the needles as possible) and 180 degrees. You will make your finishing stitches over what you've just stitched. Stitch down a few inches and cut off extra (I still like to tie my extra in a knot).

 Start your seam holding the loose thread out to the side.
 Take the thread and bring it forward.
 Cross it over the new seam and serge over it.
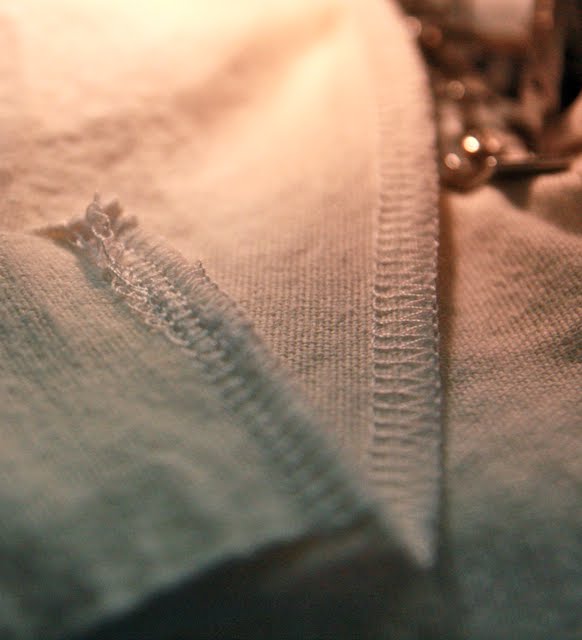 Your finished seam should look something like the above picture. A nice finished edge.
Ending a seam and the loose serger thread:
 Serge to the end of your stitching line.
 Give your thread a little slack by pushing your finger against the two needle threads. You will need this slack for flipping your fabric over. Turn your fabric over (keeping the end as close to the needles as possible) and 180 degrees. You will make your finishing stitches over what you've just stitched. Stitch down a few inches and cut off extra (I still like to tie my extra in a knot).
Wednesday, March 24, 2010
Oh the Frustration!
 I've been working on more lunch bags to put in my Etsy shop. Isn't this one cute? It's my favorite fabric of the ones I've made so far. I was really excited to work on and finish this one.
As I was looking over the whole bag to make sure everything was perfect, I noticed "it". It being a small slit/hole in the waterproof lining! AHH! All that time and precision for nothing. There was nothing I would have done to create that hole in the process of sewing and then I remembered back to when I purchased the fabric . . . (story below the pictures).
 I looked and saw something. Looking a little closer there's no way I would miss it.
 A small whole that might as well have been a GIANT hole.
I purchased just under a yard of my waterproof nylon lining at Jo Ann fabric. When I got home I put it on my counter top to cut the pattern out. I noticed small little cuts/slits throughout the fabric. I was very un-pleased and decided to take the fabric back the next day (since it was too late that night - Sad, what a wasted project night). I didn't want to pay for a big chunk of fabric when I had to cut around holes and not get my money's worth.
I took the fabric back and re-bought it as a remnant. Everything under 1 yard at Jo Ann's is made into a remnant and sold at 50% off the original price. I knew this because I used to work there years ago! After the return, I told them I would buy the piece as a remnant and explained I didn't want to pay full price for a piece of fabric that would be wasted in most spots. They helped me re-purchase the fabric (that's was another huge fiasco I won't get into here).
With my newly purchased remnant, I took the fabric home and began to salvage what I could out of the fabric. Apparently, I didn't look close enough when I cut out the pieces for my adorable orange bag :( I overlooked one small slit and now my bag won't be listed on Etsy.
My husband has some silicone waterproofing glue he uses to fix tears or rips in his backpacking tents. He says it dried clear and I can close off the hole in my bag. I believe I will seal it off this evening when he gets home :)
Sunday, March 21, 2010
Egg Face Book
I have had a quiet book started for little B for close to 9 months now. Wow! Did I just admit to having an unfinished project? I sure did. I've been overloaded with projects I've wanted to make and this book project has been pushed aside. I knew from the get-go that quiet books take time to finish, but I feel like I'm the reason it takes so long.
So, while I'm waiting around to find the best time to continue working on it, I've been keeping my eyes open for "more" (ha ha more isn't what I need right now) page ideas. I came across THIS site today. I love the Easter-ish theme and the fun different faces.
So, while I'm waiting around to find the best time to continue working on it, I've been keeping my eyes open for "more" (ha ha more isn't what I need right now) page ideas. I came across THIS site today. I love the Easter-ish theme and the fun different faces.
Wednesday, March 17, 2010
Happy Saint Patrick's Day!
 Did someone pinch you today? Well, did you wear green?
Little B was decked out in a green onesie and green flannel jacket (although seriously who needed one today with 60 degree weather! Whoot!). I wore green and so did my husband (after being told he needed to). I wanted to do something special like make sugar cookies or a fun green St Patrick's Day craft, but found myself too busy and got carried away enjoying the nice weather outside. Who can blame me right?
Photo Credit
Tuesday, March 16, 2010
Pack n' Play sheet
 The plastic mattress pad in a pack n' play shouldn't be slept on - at least in my opinion. I usually bring along a twin sheet or a large baby blanket to put over the mattress. I won't lie, it's a pain and with a child who doesn't stay put in the night it usually comes up. I finally decided to simply make a pack n' play sheet! That way my son would have a sheets the whole night with out getting tangled in them.
 I simply measured both sides of the pad.
 I used an old twin sheet and used those same measurements. It was 23 by 35. I made sure to use the finished end of the sheet for the top (see below). That way I would already have a finished edge to sew the snaps on.
I simply sewed up the three sides - leaving the already finished end at the top. Serging makes the ends much more finished.

Simply slide the sheet onto the mattress to make sure it fits. If it's a little too loose somewhere just take in that side to make it fit nice and snug.
 The opened end needs to have snaps sewn onto it. I haven't quite gotten around to this yet. . . It's my project while watching "my show" tonight.
Doesn't it look so much more comfy?


Monday, March 15, 2010
Duvet Cover - do it yourself!
 A white comforter is a problem! White always gets dirty. At least in my house. I made my own duvet cover to 1 - save money and 2 - protect my Hungarian goose down comforter.
I measured the length of the comforter - roughly 2 1/4 yards. I then purchased about 4 1/2 yards of two different fabrics (front and back). I cut the fabric in half and created a seam on the front and back of my duvet.
 I left a bit extra from the front to sew over to the back side. I also top stitched the front and back around the seams for a finished edge.
I hemmed the open ends at the bottom (allowing an opening for putting in and taking out the duvet). I sewed 8-9 snaps along the bottom to close the opening.

Saturday, March 13, 2010
How to Make Bias Tape
 I've been making bias tape at home for a long time. You can get the perfect color you need and it's a lot cheaper than buying the little packets at the store (limited color/no design choice).
This tutorial will be using a half yard of fabric to create 1/2 inch bias tape.
Here we go:
 1 - I started with a half yard this time. If you need more (or want an extra abundance of one color/design) you can use a yard. However, this tutorial will not show you how to cut and add the back the extra fabric.
 2 - Fold over the ends to make a 45 degree angle. This angle is the "bias". Notice how I folded both sides of the fabric. You should have something that looks like a parallelogram when both sides are folded.
3 - Cut on the fold (pictured below). This will take the folded-in flaps off the parallelogram.

4 - Draw lines 2 inches apart. If you have a rotary cutter clear ruler, use it! I do not and so I cut out a 2" poster board ruler guide for myself. Start measuring from the diagonal line you just cut/created.
 Cut off any extra fabric that is not 2" at the end. This strip was just under 2".
5 - Next label each section with numbers. Start on one end of the fabric and number the sections 1, 2, 3, etc. On the other end of the fabric start 0, 1, 2, 3, etc.
*So the far left of the top of your fabric will start with 0, 1, 2, 3, etc. The bottom far left will start 1, 2, 3, etc. The section at the top left starting with 0, will have a 1 at the bottom of that same section. I hope I didn't lose anyone.

6- Bring your fabric around to create a "crooked tube" - if you will. Match the numbers up with their correct number. The section with zero will not match up to another number.
 7 - *Pin the lines together. Make sure lines match up exactly!! This is very important to ensure correct width of bias tape for the whole length.
*I've found matching lines up about a quarter inch (my seam allowance) below the raw edge of the fabric helps keep lines in a straight line. Once you pin the fabric together 1/4" from raw edge, fold the seam allowance open to make sure lines still match up.
8 - Sew tube closed. You should have one unmatched section at the one end of the finished seam/tube, and another unmatched section at the other end of the seam. (unmatched section pictured below on the far left)

 9 - Cut along the lines. If done correctly, you should have one continuous strip of bias tape. Check before cutting!!! If your sections dead end, check steps 6 and 7 again.
10 - Iron bias tape. Fold tape in half and iron. Bring in each raw end to center fold. Iron again. (pictured below).

11- Roll up.
I hope this tutorial helped. Please let me know if you get stumped or confused at any step!
Friday, March 12, 2010
Small Travel Baby Blanket
 My mother in-law made Little B a baby blanket when he was born. I love the fabric choice and the soft minkee on the back. Because there were left over scraps, she left them with me. I decided to make him a smaller blanket for travel and easy carrying. I realize some kids are tied to their blankets and the full blanket can be a big load to take for running errands.
 I used the same fabric for the front and then backed it with the minkee - even used the same bias tape. This blanket size is perfect for little B to hold and walk around with.
 Here's the original quilt.
 Kaleidoscope pattern with bears.
Even though we would snuggle with the big blanket, B liked to hold the smaller one while we read stories. He's now at the age where he's not as interested. I think kids either get attached to a toy or a blanket or they don't. B was one who really didn't. I just had the little one ready in case he did.

Thursday, March 11, 2010
Library Book Bag
 A few months ago I made this little tote for a diaper/toy bag to take to church. I used it for a while and then decided I needed something bigger. I have recently found a new purpose for my tote. It's my library book bag!
 The corners are squared perfectly for books.
 Handles long enough to go around my shoulder.
 Perfect size for the books I get and can stand on it's own ;)
 My new little tote!
Tuesday, March 9, 2010
Scratch That
I've decided against my shoe rack idea. :(
I know, I know, I even had the fabric cut out. I just didn't have it in me to sew it together. Plus, I wasn't willing to put forth the time it would require to make the finished product look nice (or decent enough to use - even though it would be hidden in the back of my closet). I've had my serger and sewing machine out for a few days now ready to piece the fabric together, but my heart wasn't in it. I figure with all the things I want to sew I should move onto something I will actually enjoy.
So . . . I went to Target today and purchased me a nice BLUE shoe rack like the one I pictured a few days ago. It was only $6.95. Can't beat that. My time is a little more valuable these days.
Just thought I'd let you know why I dropped the ball.
Monday, March 8, 2010
Etsy Shop Open!
I've finally completed the finishing touches on my reusable lunch bags/lunch sacks! I've listed 3 of them in my new Etsy Shop. It's been months in the making and they're finally listed. Check out my link on the side bar.

You may remember THIS POST from January.
I made these lunch bags for my sister and sister in-law for Christmas. I created my own pattern and sewed each one myself. I still haven't gotten around to making a "brown" one for my husband yet . . . Perhaps for this next Christmas :) That gives me a few months, right?

Visit my Esty Shop!!
Thursday, March 4, 2010
Idea!?
I would like more space on the floor of my closet. I have a shelved shoe rack, but it doesn't hold all of my shoes. I need something for the smaller flats and sandals.
I'm in the process of creating a pattern for a hanging shoe rack. Idea's are only stirring in my head as of now - I have yet to act on them. So far, I figure it would be cheaper to use some scrap fabric, cardboard supports, and baby hangers to complete the project rather than buy one. My husband has a hanging rack on his side of the closet, so that will be my "go to" for a more specific pattern.
I'll keep you posted with this project idea.

Subscribe to:
Posts (Atom)